前言
前两篇文章介绍了虚幻引擎中计算管线和图形管线的调用流程,但示例中仅在某个 Actor 的 BeginPlay() 中调用了一次。如果希望在每一帧都执行这个自定义管线 ,又该如何实现呢?
这时就需要借助 SceneViewExtension。SceneViewExtension 为我们提供了渲染流程中多个阶段的 Hook,既涵盖游戏线程 ,也包含渲染线程 。通过重载对应的虚函数,我们可以实现例如:
修改视口(View)的相关属性;
获取RDG中的相关资源,例如GBuffer、SceneColor等;
注入并执行自定义着色器;
然而,正如其名字所暗示的那样,SceneViewExtension 本质上只是一个“扩展点”,它并不会改变 Unreal Engine 内部真正的光照模型。即使我们在某个 Hook 中基于 GBuffer 重新计算了一套完整的光照结果,也只是在现有渲染结果之上额外进行了一次计算 ,并不会影响引擎内部的光照流程本身。
在理解了这一限制之后,SceneViewExtension 更适合用于一些非侵入式的渲染扩展 。因此,本文将介绍如何利用 SceneViewExtension 实现一个简单的后处理效果——一个“丐版”的复古电视机滤镜。本文使用的虚幻引擎版本仍然是 5.7 。
代码参考了Github上的一个模板:SceneViewExtensionTemplate
本项目的源码:OnikataHoshio/LearnRDG
配置SVE插件
配置虚拟路径映射
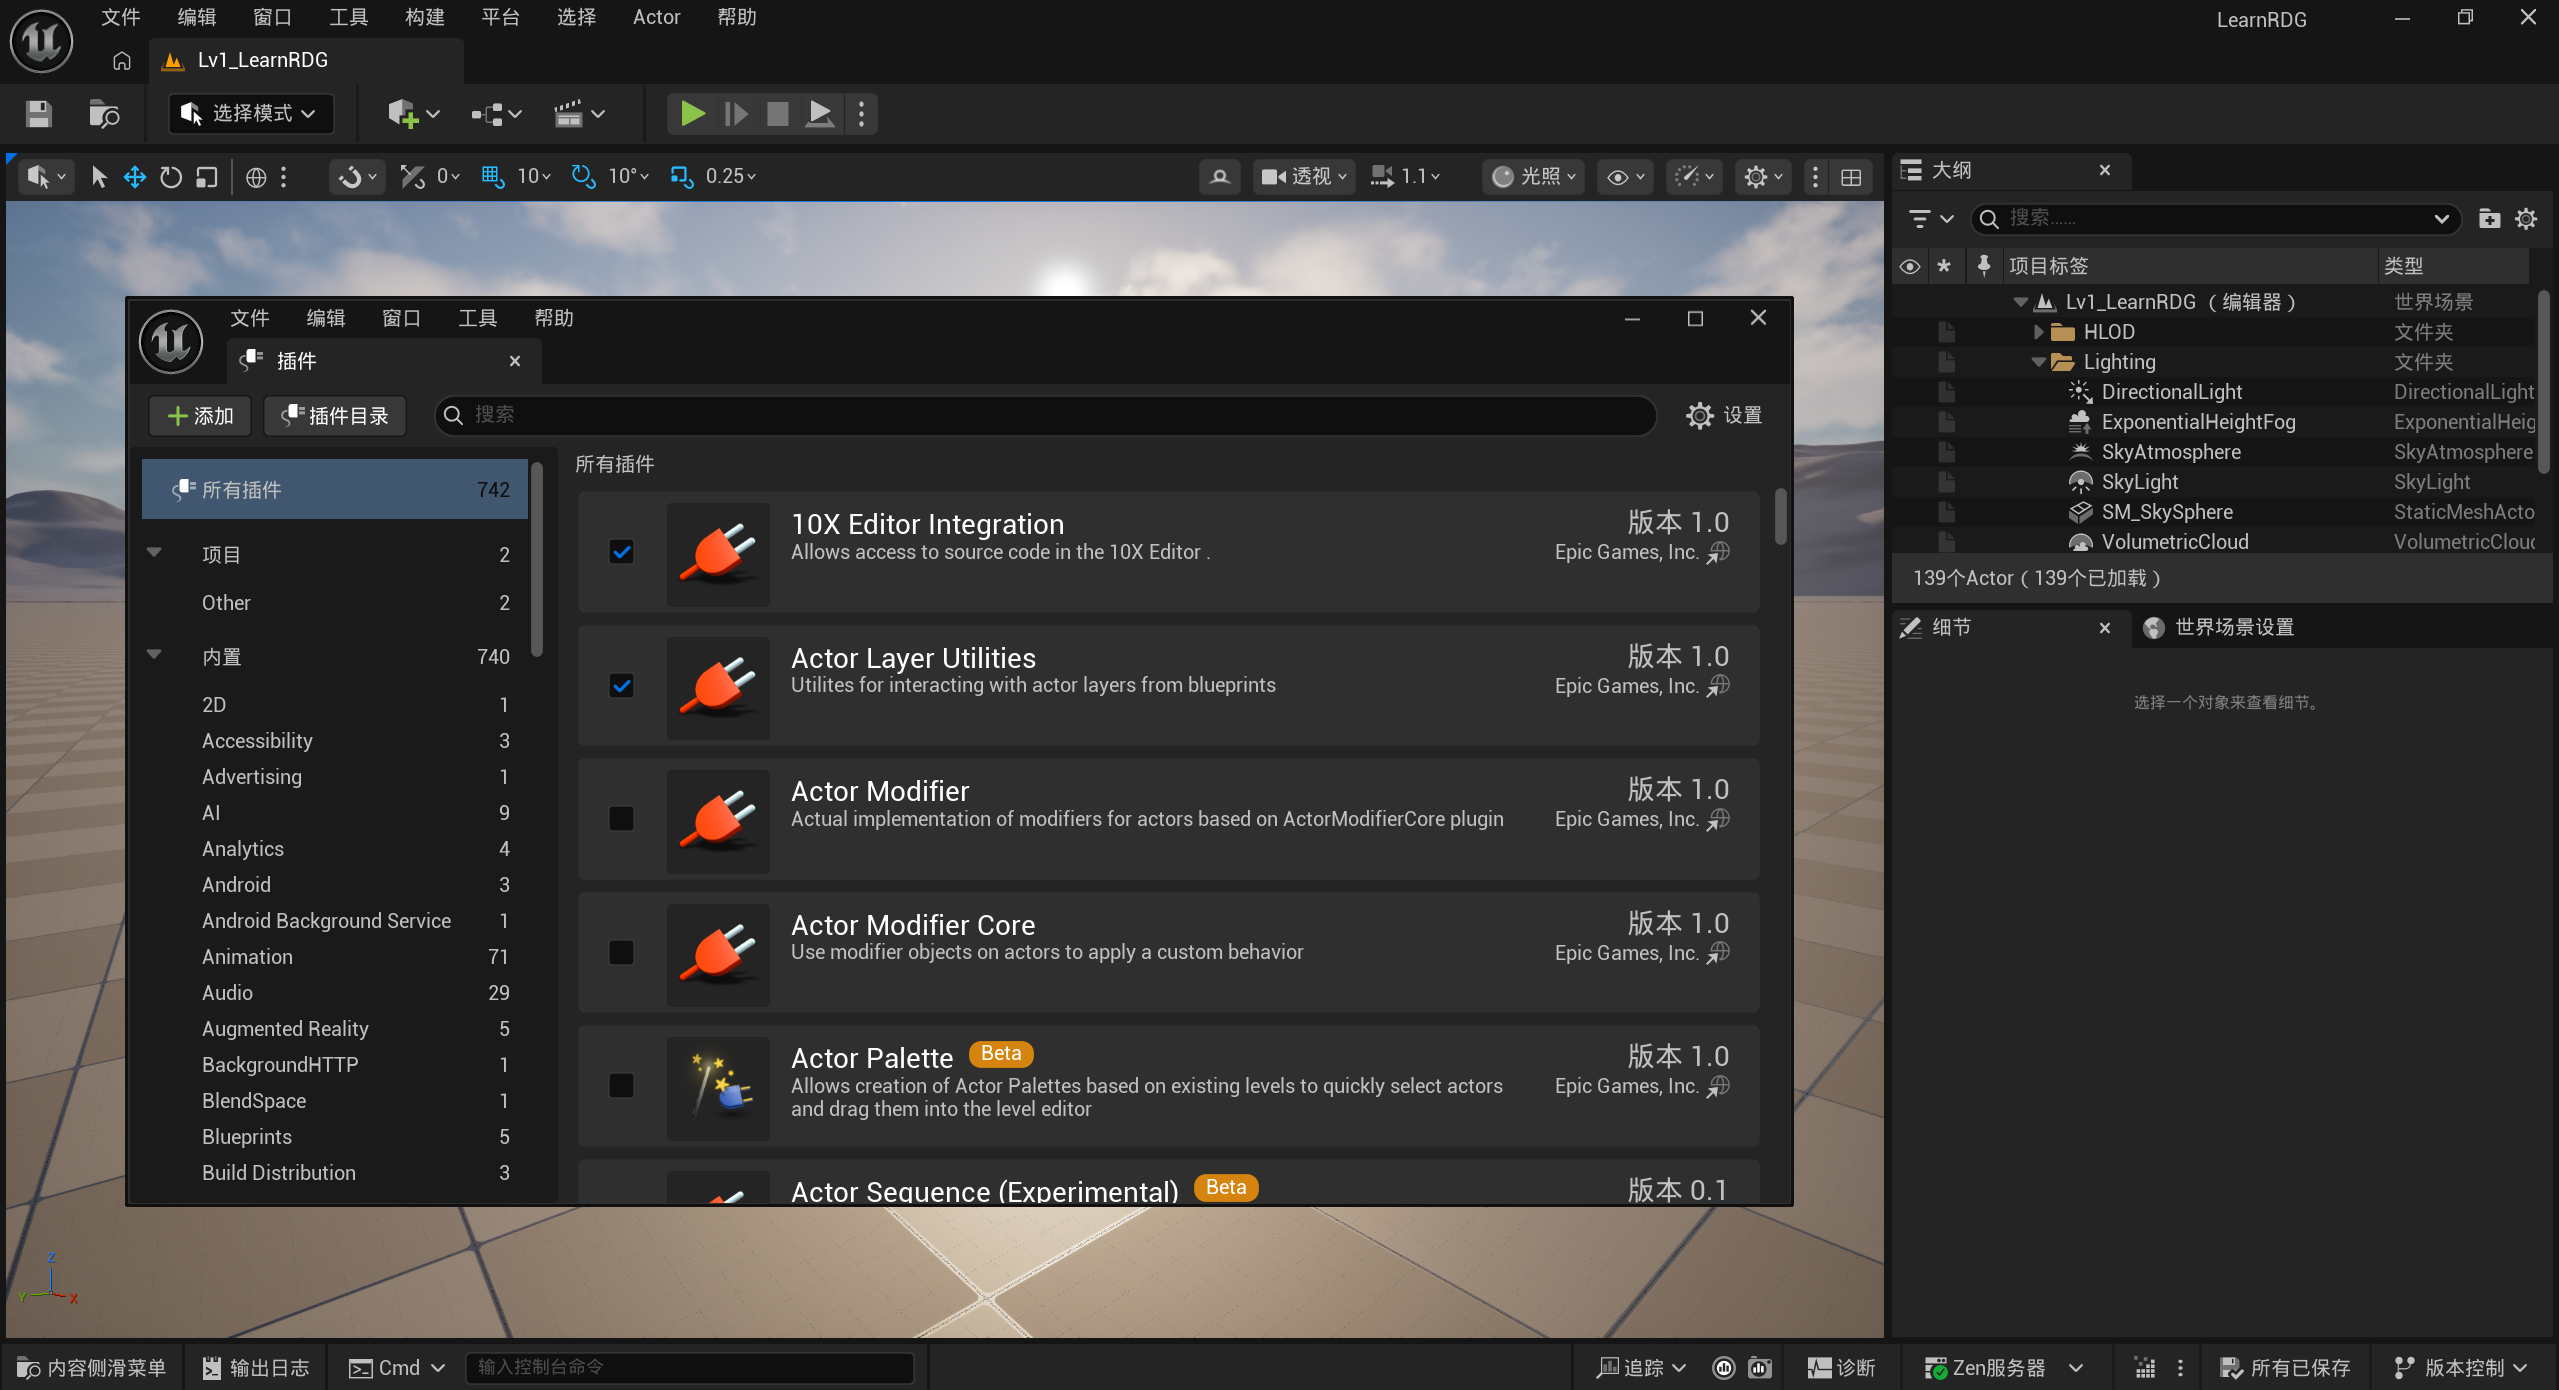
打开虚幻引擎,依次点击 编辑 → 插件 → 添加 ,创建一个新的插件,这里将其命名为 RetroTV 。
随后打开生成的 C++ 项目 ,在 RetroTV.cpp 中为插件添加 Shaders 目录的虚拟路径映射 。
1
2
3
4
5
6
void FRetroTVModule::StartupModule () Combine (FPaths::ProjectPluginsDir (), TEXT ("/RetroTV/Shaders" ));AddShaderSourceDirectoryMapping (TEXT ("/Plugins/RetroTVShaders" ), PluginShaderDir);
通过这一步配置,我们就可以将所有与该插件相关的 .usf 着色器文件,直接放在插件目录下的 Shaders 文件夹中,而不需要放入引擎或项目的全局 Shader 目录。最终的目录结构如下:
1
2
3
4
5
6
LearnRDG
配置模块依赖
接下来需要在 RetroTV.Build.cs 中配置插件所需的模块依赖与路径依赖。RenderCore、Renderer 以及 RHI 模块;Projects 模块用于配置 Shader 的虚拟路径映射;而 DeveloperSettings 则用于辅助我们读取和引用部分配置或资源。
1
2
3
4
5
6
7
8
9
10
11
12
13
14
15
16
17
18
19
20
21
22
23
24
25
26
var EngineDir = Path.GetFullPath (Target.RelativeEnginePath);AddRange (new string[] {Combine (EngineDir, "Source/Runtime/Renderer/Private" ),Combine (EngineDir, "Source/Runtime/Renderer/Internal" )AddRange (new string[]"CoreUObject" ,"Engine" ,"Slate" ,"SlateCore" ,"RenderCore" ,"Renderer" ,"RHI" ,"Projects" ,"DeveloperSettings"
修改RetroTV.uplugin
打开RetroTV.uplugin,将Modules 中的 LoadingPhase 从 Default 修改为 PostConfigInit,否则可能会出现 Shader 在虚拟路径尚未建立之前就被编译 的问题,从而导致编译失败或路径无法解析。
1
2
3
4
5
6
"Modules" : ["Name" : "RetroTV" ,"Type" : "Runtime" ,"LoadingPhase" : "PostConfigInit"
编写usf文件
我希望实现一个“丐版”的复古电视风格效果,整体可以拆分为以下四个主要环节:
镜头畸变;
电视机蒙版;
噪点;
扫描线。
除此之外,还可以进一步加入诸如高斯模糊、UV 突变等效果。不过考虑到这只是一个用于练手和验证流程的小工程,本文中不会将实现设计得过于复杂。
此外,由于如何编写usf文件不是本篇文章的重点,因此直接给出相关代码:
1 2 3 4 5 6 7 8 9 10 11 12 13 14 15 16 17 18 19 20 21 22 23 24 25 26 27 28 29 30 31 32 33 34 35 36 37 38 39 40 41 42 43 44 45 46 47 48 49 50 51 52 53 54 55 56 57 58 59 60 61 62 63 64 65 66 67 68 69 70 71 72 73 74 75 76 77 78 79 80 81 82 83 84 85 86 87 88 89 90 91 92 93 94 95 96 97 98 99 100 101 102 103 104 105 106 107 108 109 110 111 112 113 114 115 116 117 118 119 120 121 122 123 124 125 126 127 128 129 130 131 132 133 134 135 136 137 #include "/Engine/Public/Platform.ush" #include "/Engine/Private/Common.ush" #include "/Engine/Private/ScreenPass.ush" float RetroScaleFactor;float LensDistortionK1; float LensDistortionK2; float VignetteStart; float VignetteEnd; float VignettePower; float VignetteIntensity; float ScanlineSpeed;float ScanlineIntensity;float ScanlineScale;SCREEN_PASS_TEXTURE_VIEWPORT (SceneColorViewport)float CalcaulateLuminance (float3 color) return dot (color, float3 (0.2126f , 0.7152f , 0.0722f ));float GetNoise (float2 p, float offset) return frac (sin (dot (p + offset, float2 (12.9898 , 78.233 ))) * 43758.5453 );float HDRToLDR (float3 color) float luma = CalcaulateLuminance (color);return luma / (1.0f + luma); float4 CalculateColorGrain (float3 hdrColor, float2 uv) float lumaLDR = HDRToLDR (hdrColor);GetNoise (seed , 0.1337 ); GetNoise (seed , 0.4242 ); GetNoise (seed , 0.5342 ); float strength = 1.0 - pow (abs (lumaLDR - 0.5 ) * 2.0 , 2.0 );0.5f ) * strength * lumaLDR; return float4 (grain, 1.0f );float2 CalculateDistortedUV (float2 screenCoord, float viewAspect) float r2 = dot (p, p);float scale = 1.0f + LensDistortionK1 * r2 + LensDistortionK2 * (r2 * r2);1.0f ) * 0.5f ;return distortedUV;float4 CalculateDistortedColor (float2 distortedUV, float viewAspect) float2 (SceneColorViewport_ViewportMin) * SceneColorViewport_ExtentInverse + SceneColorViewport_ExtentInverse;float2 (SceneColorViewport_ViewportMin + SceneColorViewport_ViewportSize) * SceneColorViewport_ExtentInverse - SceneColorViewport_ExtentInverse;bool outside = any (distortedUV < uvMin) || any (distortedUV > uvMax);clamp (distortedUV, uvMin, uvMax);SampleLevel (GlobalBilinearClampedSampler, safeUV, 0 );if (outside) distortedColor = float4 (0 ,0 ,0 ,1 );return distortedColor;float CalculateVignette (float2 distortedUV) 2.0f - 1.0f ;float dist = length (centeredUV);float vignette = smoothstep (VignetteStart, VignetteEnd, dist);pow (1.0 - vignette, VignettePower);lerp (1.0f , vignette, VignetteIntensity);return vignette;float CalculateScanline (float2 uv) float scanline = ScanLineTexture.SampleLevel (GlobalBilinearWrappedSampler,uv,0 ).r;return 1.0f - scanline * ScanlineIntensity;numthreads (8 , 8 , 1 )]void MainCS (uint2 DispatchThreadId : SV_DispatchThreadID) if (any (DispatchThreadId >= SceneColorViewport_ViewportSize)) return ;float2 (SceneColorViewport_ViewportMin) + (float2 (DispatchThreadId) + 0.5f )) * SceneColorViewport_ExtentInverse;2.0f - 1.0f ;float viewAspect = (float )SceneColorViewport_ViewportSize.x / (float )SceneColorViewport_ViewportSize.y;CalculateDistortedUV (screenCoord, viewAspect);CalculateDistortedColor (distortedUV, viewAspect);float luminance = CalcaulateLuminance (distortedColor.rgb);CalculateColorGrain (luminance, distortedUV * SceneColorViewport_ViewportSize);float vignette = CalculateVignette (distortedUV);float scanline = CalculateScanline (sampleUV);SampleLevel (GlobalBilinearClampedSampler, sampleUV, 0 );
暂且不讨论具体的着色器实现逻辑,可以注意到我们在着色器中定义了多种不同类型的全局变量,例如 Texture2D、float 以及 RWTexture2D<float4>。这些变量在 C++ 侧有着各自不同的声明和绑定方式 ,需要分别进行处理。
除了自定义变量之外,我们还使用了一些 Unreal Engine 中已经预先声明好的内建变量。其中之一是SCREEN_PASS_TEXTURE_VIEWPORT(SceneColorViewport),该宏能够为我们提供与当前视口尺寸相关的一系列参数,因此需要引入头文件 ScreenPass.ush。View,它包含了大量与视图相关的运行时数据,例如本文着色器中用到的 View.RealTime。
创建自定义SceneViewExtension
自定义SVE类的.h文件声明
接下来就可以基于自定义着色器来编写对应的 SceneViewExtension 了。首先新建一个名为 RetroTVSceneViewExtension 的 C++ 类,并继承自 FSceneViewExtensionBase。
1
2
3
4
5
6
7
8
9
10
11
12
13
14
15
16
17
18
class RETROTV_API FRetroTVSceneViewExtension : public FSceneViewExtensionBasepublic :FRetroTVSceneViewExtension (const FAutoRegister& AutoRegister);public :void SetTVMaskTexture (const UTexture2D* InTexture) void SetScanLineTexture (const UTexture2D* InTexture) virtual void SubscribeToPostProcessingPass (EPostProcessingPass PassId, const FSceneView& View, FAfterPassCallbackDelegateArray& InOutPassCallbacks, bool bIsPassEnabled) override FScreenPassTexture CustomPostProcessing (FRDGBuilder& GraphBuilder, const FSceneView& View, const FPostProcessMaterialInputs& Inputs) ;private :
在这个 SVE 类中,我们可以通过重写诸如SetupViewFamily(FSceneViewFamily& InViewFamily)、BeginRenderViewFamily(FSceneViewFamily& InViewFamily)
不过,由于本文实现的是一个后处理效果 ,并不需要介入更早的渲染阶段,因此只需重写SubscribeToPostProcessingPass( EPostProcessingPass PassId, const FSceneView& View, FAfterPassCallbackDelegateArray& InOutPassCallbacks, bool bIsPassEnabled )CustomPostProcessing(FRDGBuilder& GraphBuilder, const FSceneView& View, const FPostProcessMaterialInputs& Inputs)。回调函数的参数有严格的要求,不可随意更改。
此外,着色器中还使用了两个 RDG 之外的外部纹理资源 ,因此需要分别创建两个资源句柄 TVMaskTextureRHI 和 ScanLineTextureRHI,并正确配置它们对应的 Set 方法。
自定义SVE的.cpp文件
注册并编译着色器
在RetroTVSceneViewExtension.cpp文件中,首先需要创建一个和.usf文件对应的计算着色器类,相关代码如下:
1
2
3
4
5
6
7
8
9
10
11
12
13
14
15
16
17
18
19
20
21
22
23
24
25
26
27
28
29
30
31
32
33
34
35
36
37
38
39
class RETROTV_API FLenDistortionCS : public FGlobalShaderpublic :DECLARE_GLOBAL_SHADER (FLenDistortionCS);SHADER_USE_PARAMETER_STRUCT (FLenDistortionCS, FGlobalShader);BEGIN_SHADER_PARAMETER_STRUCT (FParameters, )SHADER_PARAMETER_STRUCT (FScreenPassTextureViewportParameters, SceneColorViewport)SHADER_PARAMETER_STRUCT_REF (FViewUniformShaderParameters, View)SHADER_PARAMETER (float , RetroScaleFactor)SHADER_PARAMETER (float , LensDistortionK1)SHADER_PARAMETER (float , LensDistortionK2)SHADER_PARAMETER (float , VignetteStart)SHADER_PARAMETER (float , VignetteEnd)SHADER_PARAMETER (float , VignettePower)SHADER_PARAMETER (float , VignetteIntensity)SHADER_PARAMETER (float , ScanlineSpeed)SHADER_PARAMETER (float , ScanlineIntensity)SHADER_PARAMETER (float , ScanlineScale)SHADER_PARAMETER_RDG_TEXTURE (Texture2D, OriginalSceneColor)SHADER_PARAMETER_TEXTURE (Texture2D, TVMaskTexture)SHADER_PARAMETER_TEXTURE (Texture2D, ScanLineTexture)SHADER_PARAMETER_RDG_TEXTURE_UAV (RWTexture2D<float4>, Output)END_SHADER_PARAMETER_STRUCT ()static bool ShouldCompilePermutation (const FGlobalShaderPermutationParameters& Parameters) {return IsFeatureLevelSupported (Parameters.Platform, ERHIFeatureLevel::SM5);static void ModifyCompilationEnvironment (const FGlobalShaderPermutationParameters& Parameters, FShaderCompilerEnvironment& OutEnvironment) {SetDefine (TEXT ("THREADS_X" ), 8 );SetDefine (TEXT ("THREADS_Y" ), 8 );SetDefine (TEXT ("THREADS_Z" ), 1 );IMPLEMENT_GLOBAL_SHADER (FLenDistortionCS, "/Plugins/RetroTVShaders/LensDistortion.usf" , "MainCS" , SF_Compute);
我们通过 BEGIN_SHADER_PARAMETER_STRUCT() 显式声明该着色器所使用的所有全局变量。只有在这里正确地定义并绑定这些参数,才能确保 C++ 侧的数据被正确传递到着色器中:
SHADER_PARAMETER:用于声明基础类型参数,例如 float、int、uint 等常量数据;SHADER_PARAMETER_RDG_TEXTURE:用于声明 由 RDG 创建并管理的只读纹理资源 ,通常作为 Shader Resource View(SRV)使用;SHADER_PARAMETER_TEXTURE:用于声明 位于 RDG 之外、由 RHI 管理的只读纹理资源 ,常用于外部导入的纹理(如 UTexture2D);SHADER-PARAMETER_RDG_TEXTURE_UAV:用于声明 由 RDG 创建并管理的可读写纹理资源 ,通常作为 Compute Shader 的输出目标(UAV);SHADER_PARAMETER_STRUCT:用于内嵌一个 值拷贝形式的参数结构体 ,例如视口参数、常量打包参数等;SHADER_PARAMETER_STRUCT_REF:用于引用一个 由引擎统一维护的参数结构体 ,常见的例子是 View、SceneTextures 等;
最后,通过调用 IMPLEMENT_GLOBAL_SHADER() 将该着色器注册到 Unreal Engine 中,确保其在启动或编译阶段被正确编译,并能够被引擎正常识别和使用。
声明控制台变量
由于控制台变量本身具备良好的线程安全性,因此这里使用控制台变量来控制着色器中的相关参数。相关代码如下:
1
2
3
4
5
6
7
8
9
10
11
12
13
14
15
16
17
18
19
20
21
22
23
24
25
26
27
28
29
30
31
32
33
34
35
36
37
38
39
40
41
42
43
44
45
46
47
48
49
50
51
52
53
54
55
56
57
58
59
60
61
62
63
64
65
66
67
68
69
70
71
72
73
74
75
76
77
78
79
80
81
82
83
84
85
86
87
88
89
90
91
92
93
94
95
96
97
98
99
100
101
102
namespace TAutoConsoleVariable<int32> CVarShaderOn ( TEXT("r.RetroTV" ), 0 , TEXT("Enable RetroTV SceneViewExtension \n" ) TEXT(" 0: OFF;" ) TEXT(" 1: ON." ), ECVF_RenderThreadSafe) namespace TAutoConsoleVariable<float > CVarScaleFactor ( TEXT("r.RetroTV.ScaleFactor" ), 1.0f , TEXT("Update ScaleFactor \n" ), ECVF_RenderThreadSafe) namespace TAutoConsoleVariable<float > CVarLenDistortionK1 ( TEXT("r.RetroTV.LenDistortionK1" ), 0.05f , TEXT("Update LenDistortionK1 \n" ), ECVF_RenderThreadSafe) namespace TAutoConsoleVariable<float > CVarLenDistortionK2 ( TEXT("r.RetroTV.LenDistortionK2" ), 0.02f , TEXT("Update LenDistortionK2 \n" ), ECVF_RenderThreadSafe) namespace TAutoConsoleVariable<float > CVarVignetteStart ( TEXT("r.RetroTV.VignetteStart" ), 0.7f , TEXT("Update VignetteStart \n" ), ECVF_RenderThreadSafe) namespace TAutoConsoleVariable<float > CVarVignetteEnd ( TEXT("r.RetroTV.VignetteEnd" ), 1.0f , TEXT("Update VignetteEnd \n" ), ECVF_RenderThreadSafe) namespace TAutoConsoleVariable<float > CVarVignettePower ( TEXT("r.RetroTV.VignettePower" ), 2.0f , TEXT("Update VignettePower \n" ), ECVF_RenderThreadSafe) namespace TAutoConsoleVariable<float > CVarVignetteIntensity ( TEXT("r.RetroTV.VignetteIntensity" ), 0.7f , TEXT("Update VignetteIntensity \n" ), ECVF_RenderThreadSafe) namespace TAutoConsoleVariable<float > CVarScanlineSpeed ( TEXT("r.RetroTV.ScanlineSpeed" ), 0.2f , TEXT("Update ScanlineSpeed \n" ), ECVF_RenderThreadSafe) namespace TAutoConsoleVariable<float > CVarScanlineIntensity ( TEXT("r.RetroTV.ScanlineIntensity" ), 0.7f , TEXT("Update ScanlineIntensity \n" ), ECVF_RenderThreadSafe) namespace TAutoConsoleVariable<float > CVarScanlineScale ( TEXT("r.RetroTV.ScanlineScale" ), 5.0f , TEXT("Update ScanlineScale \n" ), ECVF_RenderThreadSafe)
设置纹理资源
我们还需要设置两个外部纹理资源(由 RHI 维护的纹理资源),相关代码如下:
1
2
3
4
5
6
7
8
9
10
11
12
13
14
15
16
17
18
19
20
21
22
23
24
25
26
27
28
29
30
31
32
33
void FRetroTVSceneViewExtension::SetTVMaskTexture (const UTexture2D* InTexture) nullptr ;if (InTexture && InTexture->GetResource ())GetResource ()->TextureRHI;ENQUEUE_RENDER_COMMAND (RetroTV_SetExtraTexture)this , NewRHI](FRHICommandListImmediate& RHICmdList)void FRetroTVSceneViewExtension::SetScanLineTexture (const UTexture2D* InTexture) nullptr ;if (InTexture && InTexture->GetResource ())GetResource ()->TextureRHI;ENQUEUE_RENDER_COMMAND (RetroTV_SetExtraTexture)this , NewRHI](FRHICommandListImmediate& RHICmdList)
由于输入纹理最初位于游戏线程 ,而渲染相关资源只能在渲染线程 上安全访问,因此需要借助 ENQUEUE_RENDER_COMMAND 将这些资源的引用安全地传递到渲染线程中进行处理。
注册回调函数
Unreal Engine 的后处理流程被划分为多个不同的阶段,具体的阶段名称可以在 EPostProcessingPass 枚举中查阅。一般情况下,将自定义后处理插入到 MotionBlur 阶段即可满足需求。
1
2
3
4
5
6
7
8
void FRetroTVSceneViewExtension::SubscribeToPostProcessingPass (EPostProcessingPass PassId, const FSceneView& View, FAfterPassCallbackDelegateArray& InOutPassCallbacks, bool bIsPassEnabled) if (PassId == EPostProcessingPass::MotionBlur)Add (FAfterPassCallbackDelegate::CreateRaw (this , &FRetroTVSceneViewExtension::CustomPostProcessing));
编写自定义的Pass
这一步的实现也相对简单,只需要将前面准备好的参数传递给着色器即可。由于使用的是计算管线,不需要配置图形管线中诸如顶点布局、渲染状态等相关参数,因此整体流程显得更加简洁明了。代码如下:
1
2
3
4
5
6
7
8
9
10
11
12
13
14
15
16
17
18
19
20
21
22
23
24
25
26
27
28
29
30
31
32
33
34
35
36
37
38
39
40
41
42
43
44
45
46
47
48
49
50
51
52
53
54
55
56
57
58
59
60
61
62
63
64
65
66
FScreenPassTexture FRetroTVSceneViewExtension::CustomPostProcessing (FRDGBuilder& GraphBuilder, const FSceneView& SceneView, const FPostProcessMaterialInputs& Inputs) const FSceneViewFamily& ViewFamily = *SceneView.Family;const FScreenPassTexture& SceneColor = FScreenPassTexture::CopyFromSlice (GraphBuilder, Inputs.GetInput (EPostProcessMaterialInput::SceneColor));if (!SceneColor.IsValid () || CVarShaderOn.GetValueOnRenderThread () == 0 )return SceneColor;const FScreenPassTextureViewport SceneColorViewport (SceneColor) RDG_EVENT_SCOPE (GraphBuilder, "RetroTV Postprocess Effect" );GetGlobalShaderMap (ViewFamily.GetFeatureLevel ());TShaderMapRef<FLenDistortionCS> ComputeShader (GlobalShaderMap) ;FLinearColor ClearColor (0. , 0. , 0. , 0. ) ;FClearValueBinding (ClearColor);CreateTexture (OutputDesc, TEXT ("LenDistortion Effect Output Texture" ));AllocParameters <FLenDistortionCS::FParameters>();Size ();GetValueOnRenderThread ();1. GetValueOnRenderThread ();2. GetValueOnRenderThread ();GetValueOnRenderThread ();GetValueOnRenderThread ();GetValueOnRenderThread ();GetValueOnRenderThread ();GetValueOnRenderThread ();GetValueOnRenderThread ();GetValueOnRenderThread ();IsValid () ? TVMaskTextureRHI : GWhiteTexture->TextureRHI;IsValid ()? ScanLineTextureRHI : GWhiteTexture->TextureRHI;GetScreenPassTextureViewportParameters (SceneColorViewport);CreateUAV (FRDGTextureUAVDesc (OutputTexture));GetGroupCount (PassViewSize, FComputeShaderUtils::kGolden2DGroupSize);AddPass (RDG_EVENT_NAME ("LenDistorted Post Processing CS Shader %dx%d" , PassViewSize.X, PassViewSize.Y),return FScreenPassTexture (OutputTexture, SceneColor.ViewRect);
值得一提的是,我们需要额外创建一张用于写入的输出纹理 ,而不能直接对输入的 SceneColor 进行 UAV 写入。最方便的做法是以 SceneColor.Texture->Desc 为基础复制一份描述信息,保证分辨率、格式等属性一致;随后再对其做少量修改:为其添加 TexCreate_UAV 标志,使其可被 Compute Shader 写入,同时移除 TexCreate_RenderTargetable 和 TexCreate_FastVRAM 等与当前使用场景不匹配的标志,并设置合适的清除色。
最后返回这个新建的输出纹理即可,它会由RDG自动管理。
用DeveloperSettings获取外部纹理
至此,我们已经创建了一个自定义的 SceneViewExtension。但由于 SceneViewExtension 并不是 UObject 的子类,无法在 Unreal Editor 中直接创建蓝图或暴露可编辑属性,那么该如何将 编辑器中配置的纹理资源 传递给这个 SVE 呢?
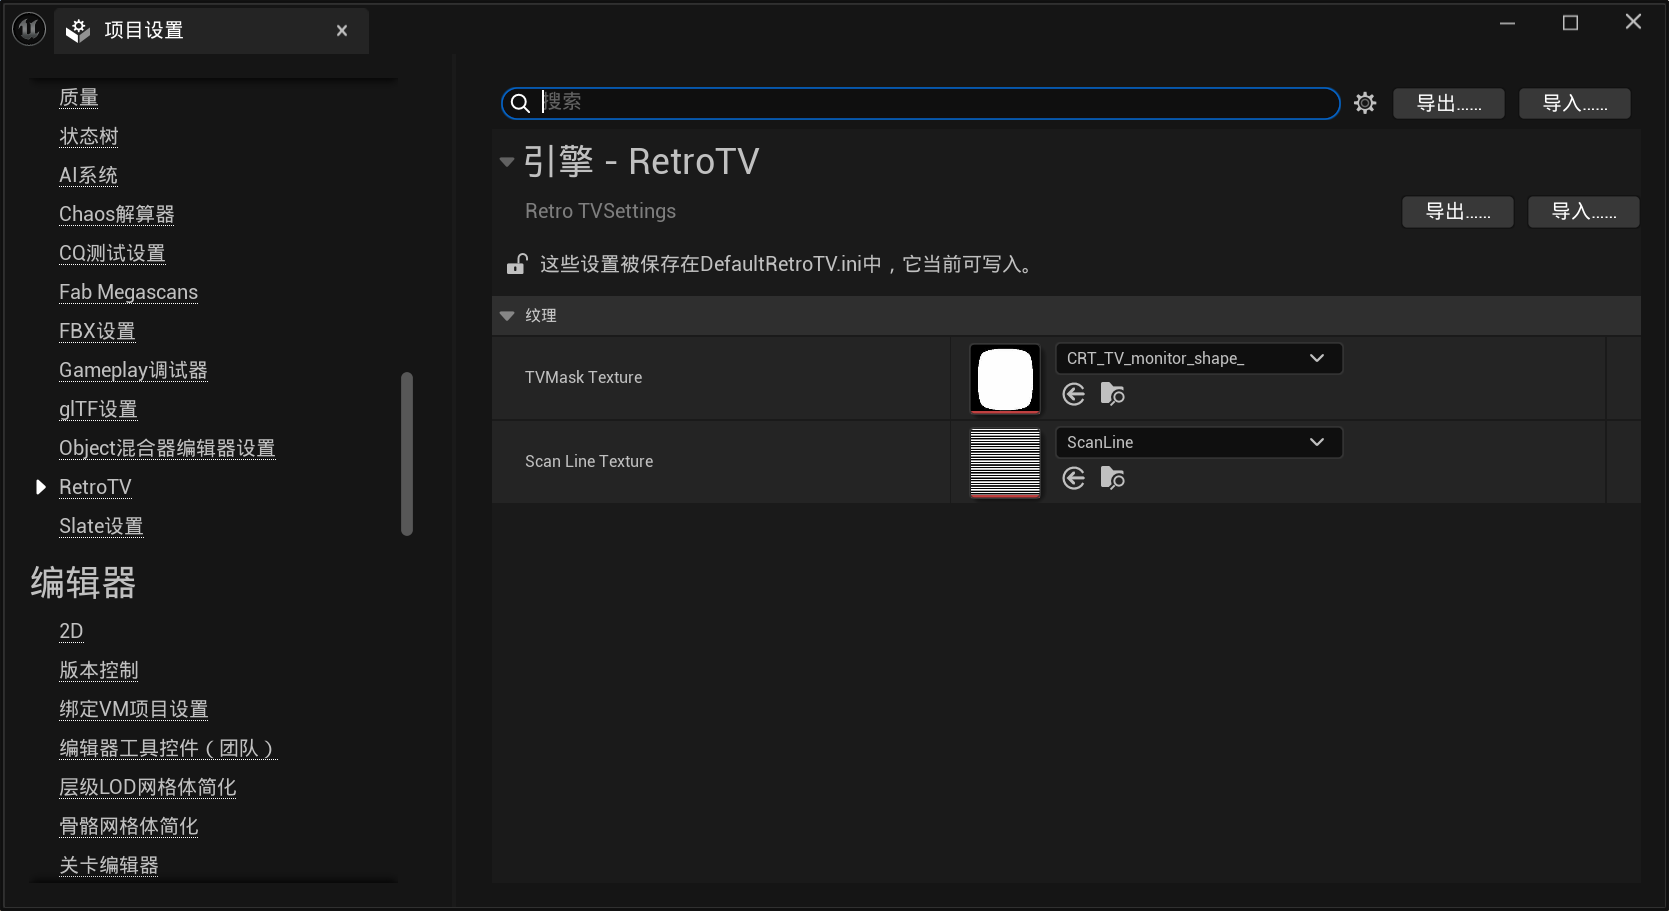
一个相对简单且常用的解决方案是借助 DeveloperSettings 类来维护这些全局资源。通过这种方式,我们可以在 项目设置(Project Settings) 的对应页面中直接指定所需的纹理或参数,而 SceneViewExtension 则在运行时读取这些配置并加以使用。
因此,新建一个C++类,父类选择DeveloperSettings,并在类中声明两个UTexture2D变量:
1
2
3
4
5
6
7
8
9
10
11
12
13
14
15
16
17
class UTexture2D ;UCLASS (Config = RetroTV, DefaultConfig, meta=(DisplayName="RetroTV" ))class RETROTV_API URetroTVSettings : public UDeveloperSettingsGENERATED_BODY ()public :UPROPERTY (EditAnywhere, Config, Category = "Textures" )UPROPERTY (EditAnywhere, Config, Category = "Textures" )URetroTVSettings () = default ;
现在打开UE的项目设置,找到RetroTV标签,打开之后就能指定资源了。
实例化自定义SVE类
在Subsystem中实例化SVE类是比较推荐的做法。因此新建一个C++类,命名为RetroTVSubsystem,父类选择UGameInstanceSubsystem。UTexture2D初始化SVE类中纹理资源。相关代码如下:
1
2
3
4
5
6
7
8
9
10
11
12
13
14
UCLASS ()class RETROTV_API URetroTVSubsystem : public UGameInstanceSubsystemGENERATED_BODY ()public :virtual void Initialize (FSubsystemCollectionBase& Collection) override virtual void Deinitialize () override private :class FRetroTVSceneViewExtension , ESPMode::ThreadSafe> CustomSceneViewExtension;
对应函数实现如下:
1 2 3 4 5 6 7 8 9 10 11 12 13 14 15 16 17 18 19 20 21 22 23 24 25 26 27 28 29 30 31 32 33 34 35 36 37 38 39 40 41 42 43 44 45 46 47 48 49 50 51 52 53 #include "RetroTVSubsystem.h" #include "RetroTVSettings.h" #include "RetroTVSceneViewExtension.h" inline void URetroTVSubsystem::Initialize (FSubsystemCollectionBase& Collection) NewExtension <FRetroTVSceneViewExtension>();UE_LOG (LogTemp, Log, TEXT ("SceneViewExtensionTemplate: Subsystem initialized & SceneViewExtension created" ));const URetroTVSettings* Settings = GetDefault <URetroTVSettings>();LoadSynchronous () : nullptr ;LoadSynchronous () : nullptr ;if (!TVMaskTexturePtr)UE_LOG (LogTemp, Warning, TEXT ("RetroTV: TVMaskTexture not set or failed to load. (Project Settings -> RetroTV)" ));return ;if (!ScanLineTexturePtr)UE_LOG (LogTemp, Warning, TEXT ("RetroTV: ScanLineTexture not set or failed to load. (Project Settings -> RetroTV)" ));return ;SetTVMaskTexture (TVMaskTexturePtr);UE_LOG (LogTemp, Log, TEXT ("RetroTV: TVMaskTexture set to %s" ), *TVMaskTexturePtr->GetName ());SetScanLineTexture (ScanLineTexturePtr);UE_LOG (LogTemp, Log, TEXT ("RetroTV: ScanLineTexture set to %s" ), *ScanLineTexturePtr->GetName ());inline void URetroTVSubsystem::Deinitialize () Empty ();const ISceneViewExtension* SceneViewExtension, const FSceneViewExtensionContext& Context)return TOptional <bool >(false );Add (IsActiveFunctor);Reset ();nullptr ;
至此所有代码编辑完成。
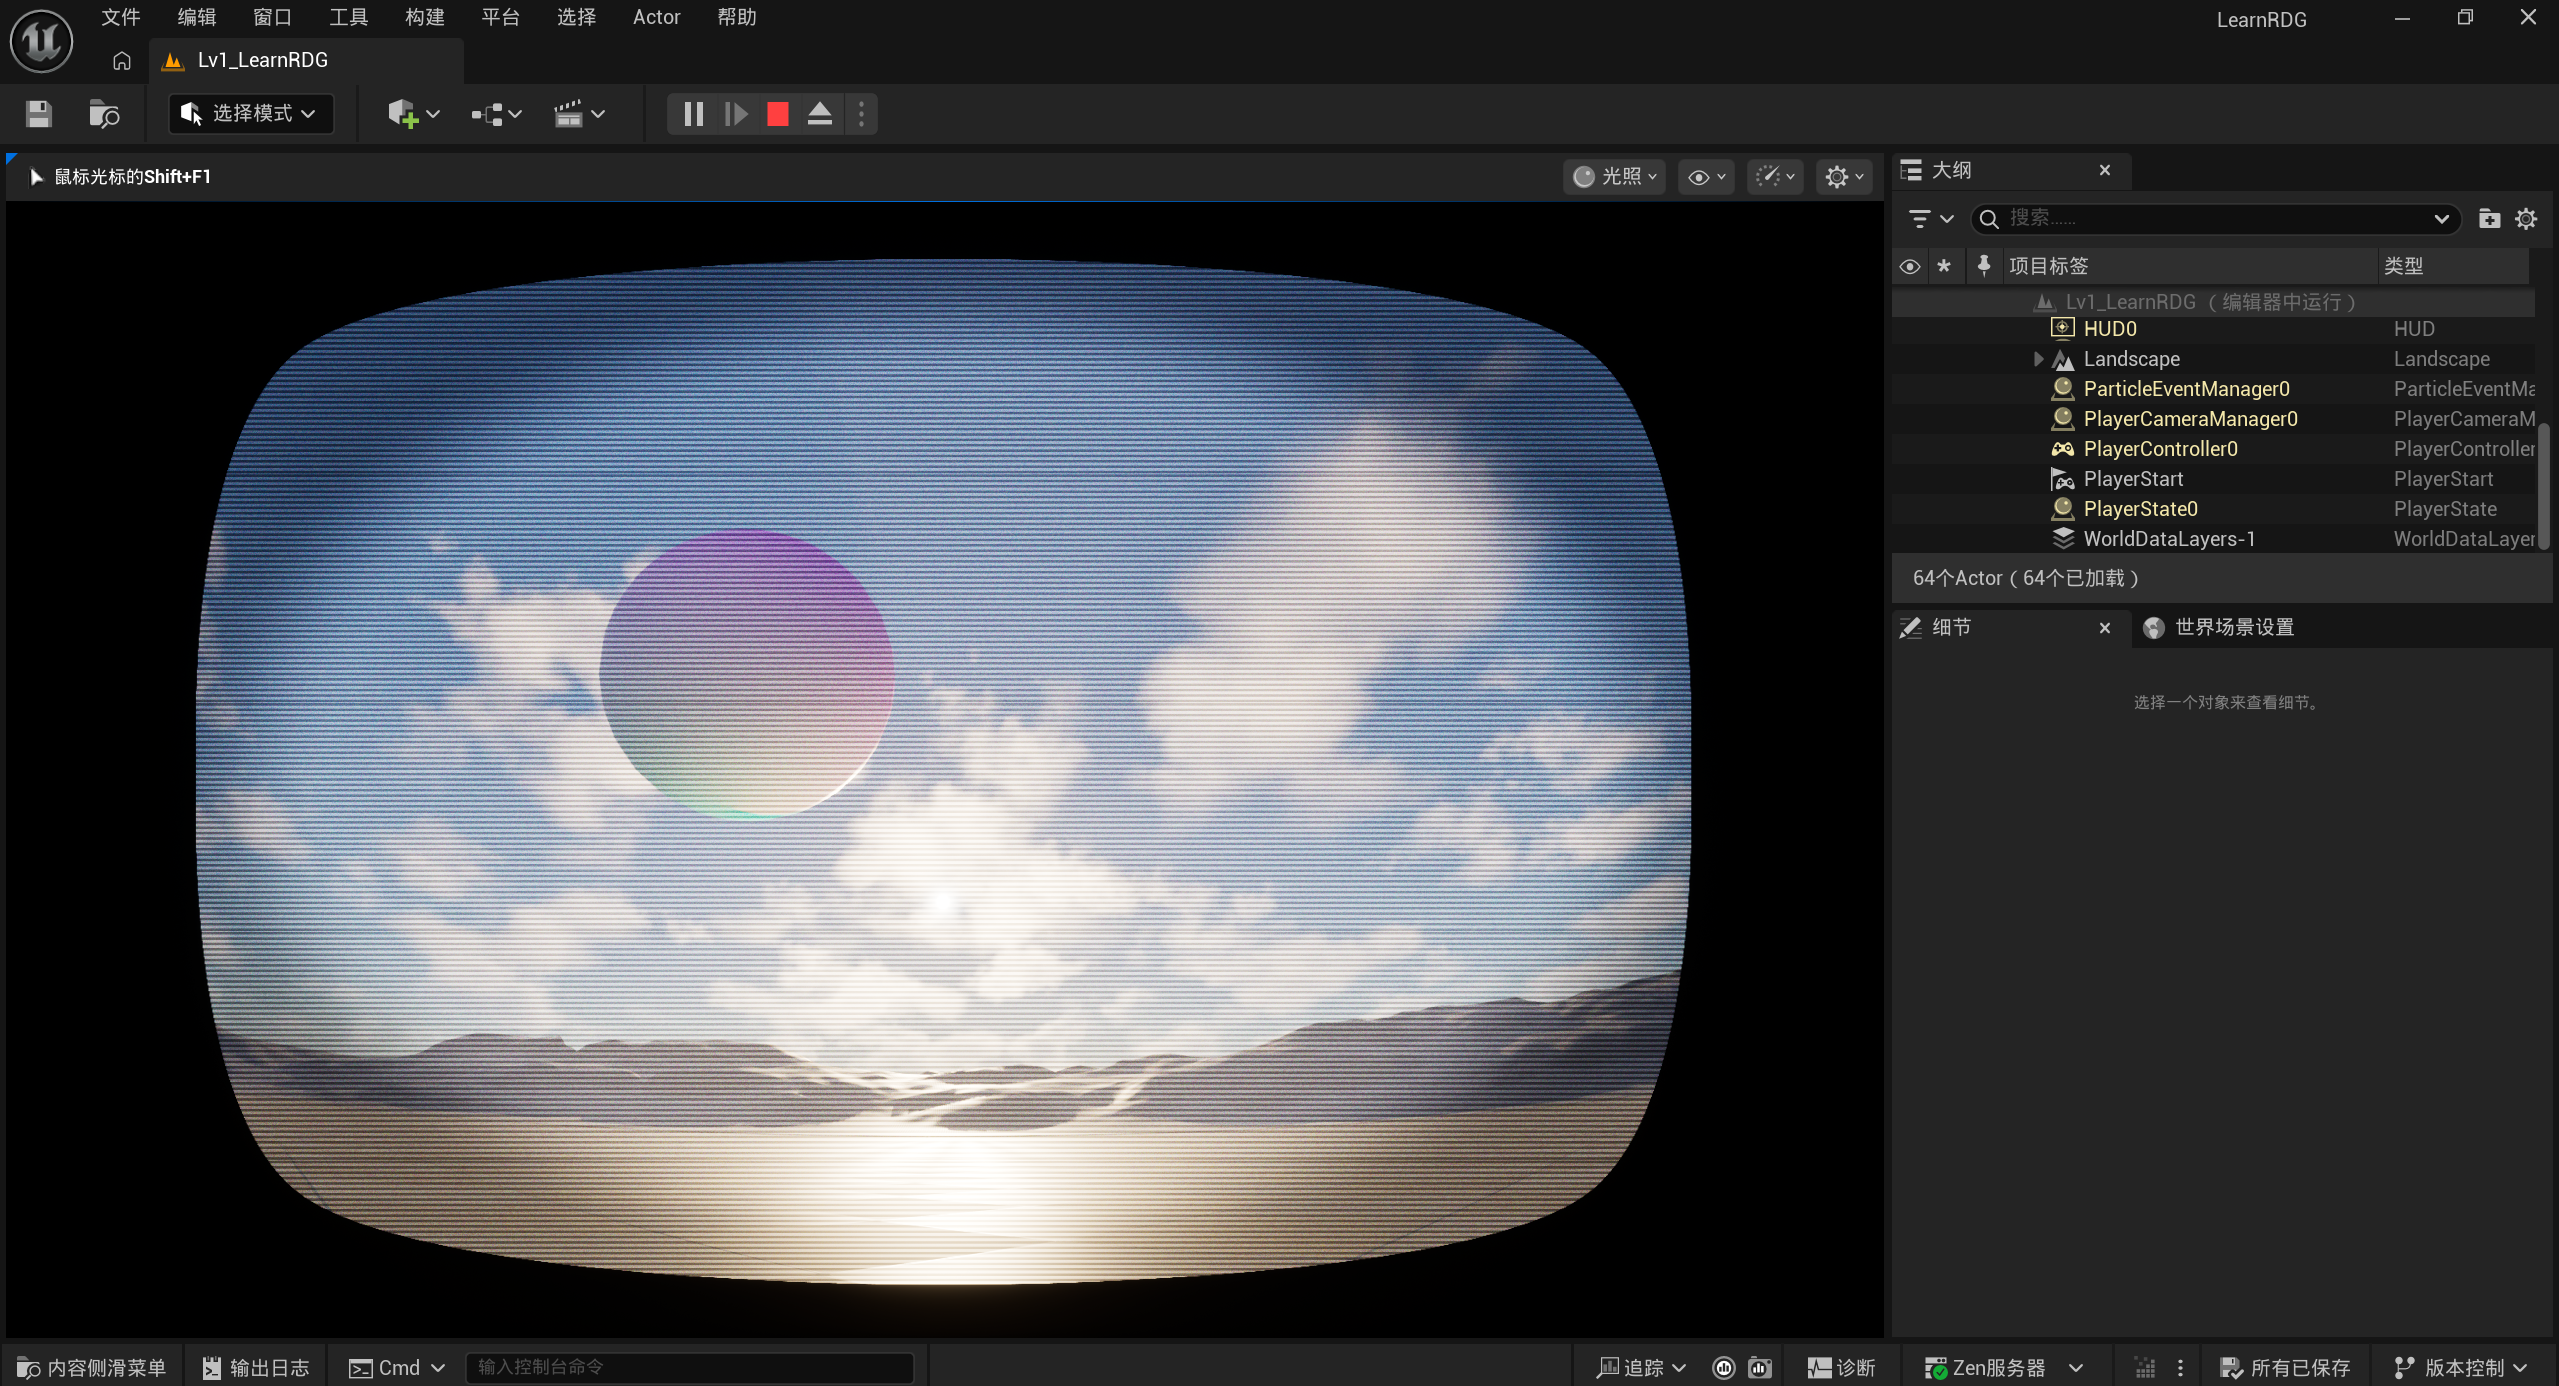
最终效果
点击模拟(第一次模拟可能会出现问题,大概率是因为资源还没有完全加载完毕),在控制台输入r.RetroTV 1即可启用这个后处理效果: